Windows 10 ARM64平台UWP串口程序
Windows 10 IoT ARM64平台支持最新的UWP框架,本文将介绍如何开发一个UWP基础串口程序。
1、创建UWP工程
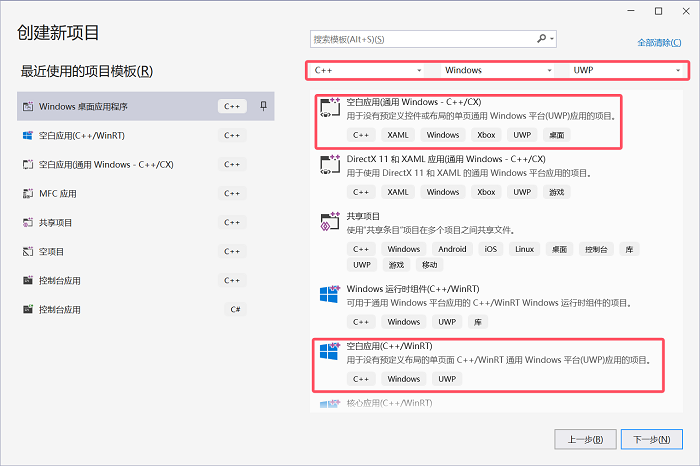
1. 打开visual studio 2022,点击“创建新项目”。
2. 选择筛选条件,语言C++或C#或VB(它们框架结构一样,库名及使用方法一样,只是不同语言写法不一样,本文以C++为例)。平台选择Windows,应用类型选择UWP。
3. 选择“空白应用”,其中后面括号标注(C++/CX)表示C++ 14规范,括号标注(C++/WinRT)表示C++ 17规范,它们语法特性有所不同,用户可选择自己更熟悉的标准创建项目(本文以C++/CX为例)。

2、UWP界面设计
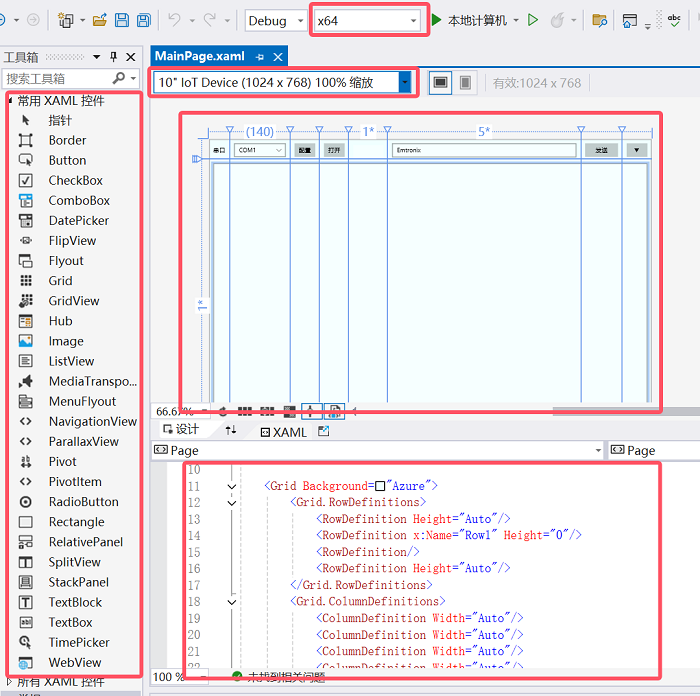
1. 创建工程后,双击解决方案资源管理器中MainPage.xaml文件进入界面编辑,先选择平台为X64,选择好工程所适应的屏幕大小。

2. UWP通过XAML语言进行界面设计,可以直接拖动控件到设计窗口中,再编辑控件的属性,即可在XAML代码页里看到自动生成的界面代码。也可以直接在XAML代码页中编辑。
3. 这里我们在Grid中创建4*8的表格,然后将控件放入相应的表格单元中,使得控件更加整齐,也便于窗口大小变化时控制自动对齐,更美观。
4. 设置好各个控件的控件名称,Margin,及事件绑定函数等。弹出子窗口可以用Flyout实现。
<Grid Background="Azure">
    <Grid.RowDefinitions>
        <RowDefinition Height="Auto"/>
        <RowDefinition x:Name="Row1" Height="0"/>
        <RowDefinition/>
        <RowDefinition Height="Auto"/>
    </Grid.RowDefinitions>
    <Grid.ColumnDefinitions>
        <ColumnDefinition Width="Auto"/>
        <ColumnDefinition Width="Auto"/>
        <ColumnDefinition Width="Auto"/>
        <ColumnDefinition Width="Auto"/>
        <ColumnDefinition Width="*"/>
        <ColumnDefinition Width="5*"/>
        <ColumnDefinition Width="Auto"/>
        <ColumnDefinition Width="Auto"/>
    </Grid.ColumnDefinitions>

    <TextBlock Text="串口" Margin="10,16,10,0" VerticalAlignment="Top"/>
    <ComboBox x:Name="ComboPort" Grid.Column="1"  Margin="10,10,10,0" VerticalAlignment="Top" SelectedIndex="0" Width="120">
        <ComboBoxItem Content="COM1"/>
        <ComboBoxItem Content="COM2"/>
        <ComboBoxItem Content="COM3"/>
    </ComboBox>
    <Button x:Name="BtnCfg" Content="配置" Grid.Column="2"  Margin="10,10,10,0" HorizontalAlignment="Stretch" VerticalAlignment="Top">
        <Button.Flyout>
            <Flyout>
                <Grid>
                    <Grid.RowDefinitions>
                        <RowDefinition Height="Auto"/>
                        <RowDefinition Height="Auto"/>
                        <RowDefinition Height="Auto"/>
                        <RowDefinition/>
                    </Grid.RowDefinitions>
                    <Grid.ColumnDefinitions>
                        <ColumnDefinition Width="Auto"/>
                        <ColumnDefinition/>
                    </Grid.ColumnDefinitions>
                    <TextBlock Text="波特率" Margin="10,10,10,0" VerticalAlignment="Center"/>
                    <ComboBox x:Name="ComboBaud" Grid.Column="1"  Margin="10,10,10,0" VerticalAlignment="Stretch" SelectedIndex="5" Width="100">
                        <ComboBoxItem Content="4800"/>
                        <ComboBoxItem Content="9600"/>
                        <ComboBoxItem Content="19200"/>
                        <ComboBoxItem Content="38400"/>
                        <ComboBoxItem Content="57600"/>
                        <ComboBoxItem Content="115200"/>
                        <ComboBoxItem Content="230400"/>
                        <ComboBoxItem Content="460800"/>
                        <ComboBoxItem Content="921600"/>
                    </ComboBox>
                    <TextBlock Text="数据位" Grid.Row="1" Margin="10,10,10,0" VerticalAlignment="Center"/>
                    <ComboBox x:Name="ComboDataBit" Grid.Row="1" Grid.Column="1"  Margin="10,10,10,0" VerticalAlignment="Stretch" SelectedIndex="1" Width="100">
                        <ComboBoxItem Content="7"/>
                        <ComboBoxItem Content="8"/>
                    </ComboBox>
                    <TextBlock Text="停止位" Grid.Row="2" Margin="10,10,10,0" VerticalAlignment="Center"/>
                    <ComboBox x:Name="ComboStopBit" Grid.Row="2" Grid.Column="1"  Margin="10,10,10,0" VerticalAlignment="Stretch" SelectedIndex="0" Width="100">
                        <ComboBoxItem Content="1"/>
                        <ComboBoxItem Content="1.5"/>
                        <ComboBoxItem Content="2"/>
                    </ComboBox>
                    <TextBlock Text="校验" Grid.Row="3" Margin="10,10,10,0" VerticalAlignment="Center"/>
                    <ComboBox x:Name="ComboParity" Grid.Row="3" Grid.Column="1"  Margin="10,10,10,0" VerticalAlignment="Stretch" SelectedIndex="0" Width="100">
                        <ComboBoxItem Content="无"/>
                        <ComboBoxItem Content="奇"/>
                        <ComboBoxItem Content="偶"/>
                    </ComboBox>
                </Grid>
            </Flyout>
        </Button.Flyout>
    </Button>
    <Button x:Name="BtnOpen" Content="打开" Grid.Column="3"  Margin="10,10,10,0" HorizontalAlignment="Stretch" VerticalAlignment="Top" Click="BtnOpen_Click"/>
    <TextBox x:Name="TBoxInfo" Grid.Column="4" Margin="10,14,10,0" BorderThickness="0" HorizontalAlignment="Stretch" VerticalAlignment="Top" IsReadOnly="True" Foreground="Red"/>
    <TextBox x:Name="TBoxSend" Grid.Column="5"  Margin="10,10,10,0" HorizontalAlignment="Stretch" VerticalAlignment="Top" Text="Emtronix" TextWrapping="Wrap" AcceptsReturn="True"/>
    <Button x:Name="BtnSend" Content="发送" Grid.Column="6"  Margin="10,10,10,0" HorizontalAlignment="Stretch" Click="BtnSend_Click" VerticalAlignment="Top"/>
    <Button x:Name="BtnMore" Content="▼" Width="48" Grid.Column="7"  Margin="10,10,10,0" HorizontalAlignment="Right" VerticalAlignment="Top" Click="BtnMore_Click"/>
    <TextBlock Text="间隔" Grid.Row="1" Grid.Column="5" Margin="10,10,120,0" VerticalAlignment="Center" HorizontalAlignment="Right"/>
    <ComboBox x:Name="ComboTimer" Grid.Row="1" Grid.Column="5"  Margin="10,10,10,0" Width="100" SelectedIndex="0" VerticalAlignment="Top" HorizontalAlignment="Right">
        <ComboBoxItem Content="10ms"/>
        <ComboBoxItem Content="20ms"/>
        <ComboBoxItem Content="50ms"/>
        <ComboBoxItem Content="100ms"/>
        <ComboBoxItem Content="200ms"/>
        <ComboBoxItem Content="500ms"/>
        <ComboBoxItem Content="1s"/>
        <ComboBoxItem Content="2s"/>
    </ComboBox>

    <Button x:Name="BtnAuto" Content="自动发送" Grid.Row="1" Grid.Column="6"  Margin="10,10,10,0" HorizontalAlignment="Stretch" VerticalAlignment="Top" Click="BtnAuto_Click"/>
    <TextBox x:Name="TBoxRecv" Grid.Row="2" Grid.ColumnSpan="8"  Margin="10" HorizontalAlignment="Stretch" TextWrapping="Wrap" IsReadOnly="True" ScrollViewer.VerticalScrollMode="Auto"/>
    <TextBox x:Name="TBoxState" Grid.Row="3" Grid.ColumnSpan="7"  Margin="10,0,10,10" HorizontalAlignment="Stretch" IsReadOnly="True"/>
    <Button x:Name="BtnClean" Content="清空" Grid.Row="3" Grid.Column="8"  Margin="10,0,10,10" HorizontalAlignment="Stretch" VerticalAlignment="Top" Click="BtnClean_Click"/>

</Grid>
3、串口代码设计
用记事本打开工程Package.appxmanifest,在Capabilities里添加如下内容
<Capabilities>
    <Capability Name="internetClient" />
        <DeviceCapability Name="serialcommunication">
        <Device Id="any">
            <Function Type="name:serialPort" />
         </Device>
    </DeviceCapability>
</Capabilities>
3.1 查询串口
已知串口名,可以直接通过CreateFile打开串口。否则需要查询设备中的串口。
除了可以用API函数CM_Get_Device_Interface_List查询,微软专门封装了一个硬件库Devices,可以更简便地访问设备接口。
通过任务方式create_task查询接口,可以避免主界面卡顿,使用任务比使用线程更简便些。
通过创建cancellationToken,可以根据需求随时中断任务。
使用then可以链式执行任务,相比使用函数,代码逻辑可读性更高些。
Platform::Collections::Vector<Platform::Object^>^ _serialDevice;
MainPage::MainPage()
{
       InitializeComponent();
       //…
       _serialDevice = ref new Platform::Collections::Vector<Platform::Object^>();
       ListAllPorts();
}

void MainPage::ListAllPorts(void)
{
       cancellationTokenSource = new Concurrency::cancellation_token_source();

Concurrency::create_task(FindAllAsyncSerialAsync()).then([this](Windows::Devices::Enumeration::DeviceInformationCollection^ devices)
       {
              _serialDevice->Clear();
              Windows::Devices::Enumeration::DeviceInformation^ deviceInfo;
              for (auto&& deviceInfo : devices)
              {
                     _serialDevice->Append(ref new Device(deviceInfo->Id, deviceInfo));
              }
       });
}

Windows::Foundation::IAsyncOperation<Windows::Devices::Enumeration::DeviceInformationCollection^>^ MainPage::FindAllAsyncSerialAsync(void)
{
       String^ aqs = Windows::Devices::SerialCommunication::SerialDevice::GetDeviceSelector();
       return Windows::Devices::Enumeration::DeviceInformation::FindAllAsync(aqs);
}
3.2 打开串口
使用Devices库的串口方法异步打开串口,设置串口各个参数。
void MainPage::OpenPort()
{
       int index = ComboPort->SelectedIndex;

       Device^ device = static_cast<Device^>(_serialDevice->GetAt(index));
       Windows::Devices::Enumeration::DeviceInformation^ entry = device->DeviceInfo;

       concurrency::create_task(OpenPortAsync(entry, cancellationTokenSource->get_token()));
       return;
}

Concurrency::task<void> MainPage::OpenPortAsync(Windows::Devices::Enumeration::DeviceInformation^ device, Concurrency::cancellation_token cancellationToken)
{
       auto childTokenSource = Concurrency::cancellation_token_source::create_linked_source(cancellationToken);
       auto childToken = childTokenSource.get_token();
       return Concurrency::create_task(Windows::Devices::SerialCommunication::SerialDevice::FromIdAsync(device->Id), childToken)
              .then([this](Windows::Devices::SerialCommunication::SerialDevice^ serial_device)
       {
              try
              {
                     _serialPort = serial_device;

                     Windows::Foundation::TimeSpan _timeOut;
                     _timeOut.Duration = 100L;

                     // Configure serial settings
                     _serialPort->WriteTimeout = _timeOut;
                     _serialPort->ReadTimeout = _timeOut;


                     serialPort->DataBits = 115200;
                     _serialPort->DataBits = 7;
                     _serialPort->StopBits = Windows::Devices::SerialCommunication::SerialStopBitCount::One;
                     _serialPort->Parity = Windows::Devices::SerialCommunication::SerialParity::None;

                     _serialPort->Handshake = Windows::Devices::SerialCommunication::SerialHandshake::None;

                     _dataReaderObject = ref new Windows::Storage::Streams::DataReader(_serialPort->InputStream);
                     _dataReaderObject->InputStreamOptions = Windows::Storage::Streams::InputStreamOptions::Partial;
                     _dataWriterObject = ref new Windows::Storage::Streams::DataWriter(_serialPort->OutputStream);


                     Listen();
              }
              catch (Platform::Exception^ ex)
              {
              }
       });
}
绑定串口输入输出流到自定的Object中,以便后面任务通过Object读写串口。
开启任务读串口信息。
3.3 读串口
创建listen函数用于串口数据读取。
Listen函数中创建读取串口任务。使用任务或线程都可以实现代码的并发运行,具体使用任务还是使用线程,用户可以根据应用实际情况选择,一般来说任务相对简洁,适合短操作,线程更适合长时运行的操作。本文采用任务模式实现串口数据监听,读取。
void MainPage::Listen()
{
       try
       {
              if (_serialPort != nullptr)
              {
                     concurrency::create_task(ReadAsync(cancellationTokenSource->get_token()));
              }
       }
       catch (Platform::Exception^ ex)
       {
              if (ex->GetType()->FullName == "TaskCanceledException")
              {
                     ClosePort();
              }
       }
}
读取成功后,继续listen监听下一段串口信息。
Concurrency::task<void> MainPage::ReadAsync(Concurrency::cancellation_token cancellationToken)
{
       unsigned int _readBufferLength = 1024;

       auto childTokenSource = Concurrency::cancellation_token_source::create_linked_source(cancellationToken);
       auto childToken = childTokenSource.get_token();
       return concurrency::create_task(_dataReaderObject->LoadAsync(_readBufferLength), childToken).then([this](unsigned int bytesRead)
       {
              if (bytesRead > 0)
              {
                     m_Rx += bytesRead;
                     TBoxRecv->Text += _dataReaderObject->ReadString(bytesRead);
                     ShowState();
              }
              Listen();
       });
}
如果串口关闭,通过Token立刻关闭可能正在执行中的读取任务。
void MainPage::CancelReadTask(void)
{
       cancellationTokenSource->cancel();
}
3.4 写串口
当点击发送按钮时,创建任务进行串口写数据
void step2_serial::MainPage::BtnSend_Click(Platform::Object^ sender, Windows::UI::Xaml::RoutedEventArgs^ e)
{
       if (_serialPort != nullptr)
       {
              try
              {
                     WriteAsync(cancellationTokenSource->get_token());
              }
              catch (Platform::Exception^ ex)
              {
              }
       }
}

Concurrency::task<void> MainPage::WriteAsync(Concurrency::cancellation_token cancellationToken)
{
       _dataWriterObject->WriteString(TBoxSend->Text);
       auto childTokenSource = Concurrency::cancellation_token_source::create_linked_source(cancellationToken);
       auto childToken = childTokenSource.get_token();
       return concurrency::create_task(_dataWriterObject->StoreAsync(), childToken).then([this](unsigned int bytesWritten)
       {
              if (bytesWritten > 0)
              {
                     m_Tx += bytesWritten;
              }
       });
}
如果串口关闭,通过Token立刻关闭可能正在执行中的写任务。
3.5 串口关闭
当点击关闭按钮,或其它原因中断串口读写时
void MainPage::ClosePort()
{
       delete(_dataReaderObject);
       _dataReaderObject = nullptr;

       delete(_dataWriterObject);
       _dataWriterObject = nullptr;

       delete(_serialPort);
       _serialPort = nullptr;

       return;
}
通过Token通知立刻关闭任务,关闭打开的串口读写Object
CancelReadTask();
3.6 创建timer用于自动发送
可以添加一个自动发送功能方便测试,UWP中添加timer的方式如下。
Windows::UI::Xaml::DispatcherTimer^ m_Timer;
m_Timer = ref new Windows::UI::Xaml::DispatcherTimer();

TimeSpan ts;
ts.Duration = 20*10000;        //表示20ms
m_Timer->Interval = ts;
m_Timer->Tick += ref new EventHandler<Object^>(this, &MainPage::AutoTimer_Tick); //m_Timer->Start();

void step2_serial::MainPage::AutoTimer_Tick(Object^ sender, Object^ e)
{
       if (_serialPort != nullptr)
       {
              try
              {
                     if (TBoxSend->Text->Length() > 0)
                     {
                            WriteAsync(cancellationTokenSource->get_token());
                     }
              }
              catch (Platform::Exception^ ex)
              {
              }
       }
}
4、调试
打开Win10 IoT板子上的调试助手。

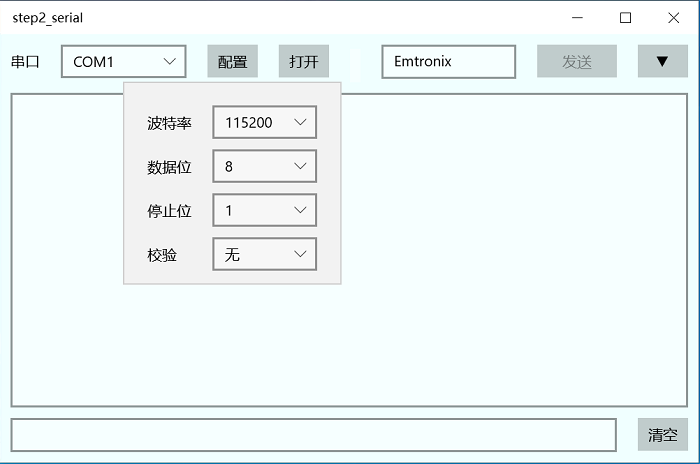
选择工程平台为ARM64,编译运行,示例如下。

需要程序源码可以联系英创工程师获得。